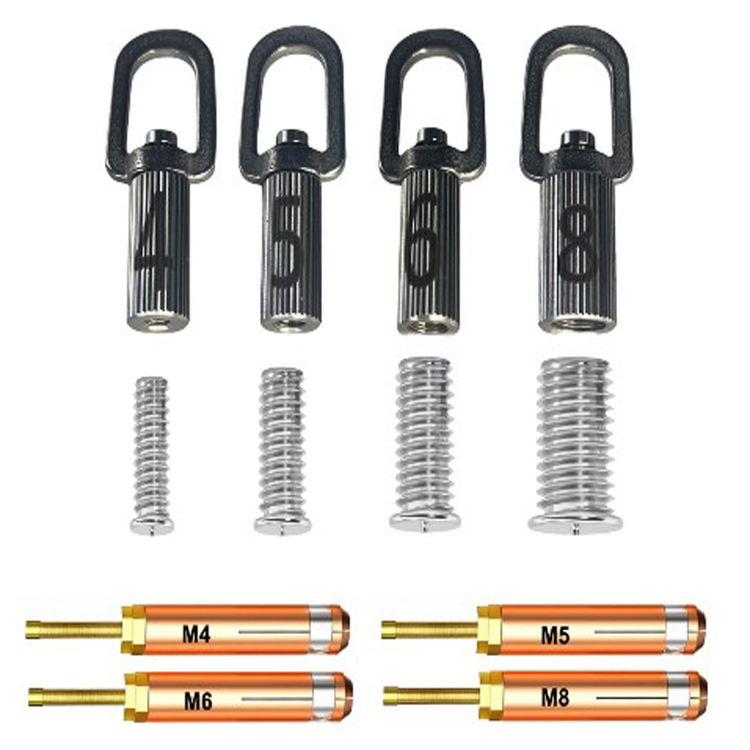
Mastering Aluminum Dent Pulling Weld Studs - Tools and Techniques
Posted by Jim Faulkner - Grade A Tools on Sep 27th 2025
Mastering Aluminum Dent Pulling Weld Studs: Essential Tools and Techniques for Modern Auto Body Shops
Introduction
In today’s automotive world, aluminum has become a go-to material for vehicle construction. From Ford’s F-150 to Tesla’s EV lineup and Audi’s luxury sedans, manufacturers rely on aluminum to reduce weight, boost fuel efficiency, and enhance crash performance.
But repairing aluminum is no small task. Unlike steel, it’s more prone to cracking, corrosion, and heat distortion. Traditional methods don’t cut it—auto body shops need specialized tools and techniques to get the job done right.
That’s where Grade A Tools steps in, offering premium weld studs, pulling tabs, and dent puller kits designed specifically for aluminum repairs.
Why Aluminum Repairs Require a Different Approach
Aluminum’s unique properties make it both a blessing and a challenge in collision repair.
- Lightweight but soft: Dents easily, risks tearing under excessive force
- Heat sensitive: Welding can weaken or distort panels
- Corrosion concerns: Steel tools and aluminum don’t mix—galvanic corrosion is a real risk
- OEM compliance: Manufacturers mandate specialized tools to keep warranties intact
The solution? Drawn arc stud welding systems, which let technicians pull dents without drilling or overheating panels.
The Power of Weld Studs in Dent Repair
At the core of aluminum dent repair is the weld stud method, powered by capacitor-discharge stud welding. Unlike traditional MIG welding, it uses minimal heat, protecting panel integrity.
Process overview:
- Preparation – Clean and strip coatings for a strong weld bond.
- Stud Welding – Use alloy-matched aluminum studs (AlMg3 or AlSi12) with capacitor-discharge welders.
- Pulling – Attach pulling tabs or rings, then reshape dents with a slide hammer or bridge puller.
- Finishing – Remove studs, grind flush, sand, and protect with anti-corrosion coatings.
Step-by-Step Guide: Aluminum Weld Stud Repair
Required Tools:
- Capacitor-discharge stud welder (GYS, ProSpot, Chief)
- Aluminum studs (AlMg3 or AlSi12, M4–M8 sizes)
- Pulling accessories (swivel tabs, slide hammer, bridge pullers)
- Heat management tools (thermometer, heat crayons, torch)
- Grinding & finishing tools (80–600 grit, files, vacuum)
- PPE (respirator, gloves, protective clothing)
Process:
- Assess & Prep – Test welder settings on scrap aluminum, remove coatings, clean the panel.
- Apply Heat – Warm dent to 400–570°F for malleability (never exceed 570°F).
- Weld Studs – Place studs at dent’s deepest points, spacing evenly.
- Pull Dent – Use loops and pulling tools to gradually reshape metal.
- Remove Studs – Snip and grind flush, avoiding panel gouges.
- Finish Surface – Sand smooth, apply filler if needed, prime, and seal with corrosion protection.
Pro Tip: Always use “Aluminum Only” tools to prevent cross-contamination and galvanic corrosion.
Top Tools from Grade A Tools
Grade A Tools specializes in aluminum repair consumables that integrate seamlessly with major welders.
- Pulling Ring Tabs with 360° Swivel (Part # GAT-TPR-M4) – Flexible, etched for size, ~$40.50
- Aluminum Dent Puller Master Kits (Part # GAT-TPR-M4568-G / -P) – 1,000+ pieces, $499
- Bulk Aluminum Studs (AlMg3, AlSi12 alloys) – Bags of 100–1,000 starting at $41.25
- Starter Kits – Alu Box Standard Kit ($115) and Stud & Screw Kit ($288.60)
Tips for Success (and Pitfalls to Avoid)
✅ Match studs to the panel alloy (AlMg3 vs AlSi12)
✅ Control heat with precision—avoid panel weakening
✅ Always wear PPE and work in ventilated areas
✅ Test on scrap before working on customer vehicles
❌ Don’t over-pull (can cause cracks or tears)
❌ Don’t skip corrosion protection

